• Skip to primary navigation
  • Skip to main content
  • Skip to primary sidebar

kylie grace snyder

audio engineering, technology, and miscellany . . .

  • blog & news
  • teaching & research
  • CV
  • U-M Wiki
  • contact

system maintenance

A Multitude Of Digital Delivery Options For Studios Of All Sizes

blog · 2011-08-10

No matter the size of your operation, whether a single mix room with the occasional client or a full-time commercial operation with countless rooms and clients, it’s an absolutely certainty that at some point you’ll be exchanging files with clients. I recently had discussions with several clients which led me to reevaluate the current options available for studios, irregardless of size. So, let’s take a look at some of the different tools which are currently available!

FTP: The Original Standard
When I first began sharing data over the internet a very long time ago the golden standard was FTP. Due to the ubiquity and inexpensive cost of web hosting coupled with ease of administration, FTP certainly isn’t going anywhere fast. The only real downside of FTP is that is does require a bit of tech savvy from both users to properly administer and use properly. For my web hosting I currently rely upon Fatcow.com (ridiculously named, but also tremendously reliable, cheap, and green!). Setting up FTP access for a user varies from host to host but generally the steps consist of the following:

  • Create a folder for your user (I use the structure of root/clients/clientname).
  • Create a new FTP account which has access to only this folder.
  • Modify the newly created directories permissions to 755 (or 0755) which will prevent unauthorized browsing.
    • Note: If you don’t want to allow clients to link directly to files within their directory, but only want files to be transferred the client software, be certain to apply appropriate permissions to the files themselves.

If you’re looking for a free FTP client to point your client towards, a good open source option which works across all platforms is FileZille which I highly recommend. It’s worth noting that most hosts offer both FTP and SFTP (secure FTP) as options so you can ensure the security of your clients. Also, while relying on web host provided FTP is one option, some studios may feel far more common hosting their own serve in house or through many of the fine collocation services available.

Enterprise Class
As I said, my goal was to see what currently exists beyond FTP because you can easily see how management could be cumbersome for those looking for a more streamlined solution. So, first lets take a look at some more enterprise focused alternatives.

If you’ve been working in audio a while then one of the most recognizable names in asset delivery would have to be DigiDelivery. Now owned and serviced by Aspera, DigiDelivery has officially reached an end of life stage as a product and will no longer be supported after December of 2011. However, Aspera has brought to the table an entirely new offering, faspex, which promises greater compatibility and speed from a web based interface. This service which is named for the underlying fasp transport technology is absolutely worth a look for enterprise level operations currently evaluating file delivery options.

Budget Conscious Yet Versatile
Organizations still seeking a managed solution but striving to remain budget conscious have available to them a varying range of dedicated hosted storage options. One interesting and often overlooked technology is Microsoft Sharepoint, including the various options available from Sherweb and other excellent providers. While slightly pricy depending on how much storage you require, Sharepoint is quite compelling in that accounts can grow and shrink in size to fit your needs, and a virtually unlimited number of accounts can be created with different levels of file access, making it a technology worthy of consideration. Another solution which provides features and support similar to Sharepoint is Cloud Files from Rackspace. More commonly used to publicly serve files as a CDN, CloudFiles can also be used for transferring large volumes of data which is ideal for many studios.

Many organizations have found it advantageous to create their own custom client portals using their existing CMS which is a great way to utilize preexisting infrastructure. To do this you obviously need a web host and while I have my favorite (Fatcow), others have found Amazon S3 to be a worthy contender if not utilizing server scripts . If you’re familiar enough with web development to feel comfortable building a client portal you know that there are myriad options for construction. However, I’ve personally had great success using a heavily modified WordPress installation which, coupled with the right plugins, can turn the process of making individual client pages into a relatively simple process. It’s worth mentioning that client portals can provide both file upload and download functionality, although file upload must generally be baked in using a third party utility like cformsII.

Living In The Cloud
A file sharing option likely familiar to most individuals due in large part to its rapidly gaining popularity is the use of various (and often free dependent on storage reuirements) cloud storage services. For instance, YouSendIt is used by studios like TreeLady and MasterMix. A great implementation of a YouSendIt drop box is currently in use by TreeLady Studios which is absolutely worth a look. It’s worth noting that when using services like YouSendIt, clients can be emailed links to directly and securely download files.

If you’re looking for other cloud based services, Dropbox is worth a serious look. Much like YouSendIt, links to files can be securely emailed to clients, and when coupled with the excellent form submission tool Jotform, Dropbox can be used as a secure upload portal. Also, a new service worth mentioning is Gobbler which is fairly new to the storage scene. While I don’t have any firsthand experience with the service, reviews have been exceedingly positive, enough so that it’s certainly worth a look.

In the discussion of cloud services you may notice that offerings from Apple like MobileMe and iCloud are notably absent. While these are absolutely wonderful for consumers, Apple has proven over the years that they have little interest in supporting the long-term needs of business, therefore I feel they are not reliable for production usage.

In The End
When it comes to digital delivery options as with most things audio, it all comes down to your needs and personal taste. Your needs (or lack thereof) will likely eliminate half of the options I’ve just laid out, and from there it’s just a matter of what best fits your workflow. No matter what delivery method you ultimately you choose I hope you’ve found this helpful.

Are you using another tool for digital delivery I’ve missed? Have some advice you’d like to share? Be sure to let me know in the comments below!
Studio Basics: Conquering Data Management Best Practices

blog · 2011-07-22

It’s a fair bet that if you’re a recording engineer or spend any amount of time in the studio you’ve probably developed a fairly consistent method of saving and working with your data. That’s good because keeping track of your data before, during and after a session can be a daunting task.

Now, when we’re talking about data management there are three main elements.

  • Digital Data
    • This is exactly what you’d think– all the digital content you’ve created during a session.
  • Physical Data
    • Also rather self explanatory but far too often overlooked. Physical data is literally everything else from a session which includes track sheets, take sheets, recall notes, etc. All of that is worth saving too.
  • Asset Management
    • This isn’t necessarily a type of data you create, though it theoretically could be if you were utilizing meta-tags. However, depending on the type of environment in which you work there are several things you could be doing to make managing your physical and digital assets just a little bit easier.

I’d imagine that most engineers are far more secure in the organization of their digital data than their physical data, which is something I’m going to address.

First of all, it’s very important to keep in mind that if you work in a large production environment it’s almost a certainty that your employer has laid out a very particular method for you to manage your data. Obviously, whatever they say goes. However, what about everyone else? I mean, that’s a lot of us!

Digital Data
If you don’t follow a consistent method of digital data organization please start. I promise you’ll thank me later. If you’ve read any of my past articles it will come as no surprise that I’m a huge proponent of the various Technical Guidelines for Producers and Engineers set forth by The Recording Academy, which are free for members and non-members alike.

While these guidelines work well for me they aren’t for everyone and might not feel right to you. So, the best advice is to discover whatever organizational method works best for you, document it, and stick with it.

Physical Data
Once you have a handle on your digital data, it’s critical to properly address your physical data storage. One of the first things I do at the conclusion of a project is photocopy all documentation, including track sheets, take sheets, recall notes, and archive listings.

Then, whenever any physical data goes into either temporary or permanent storage, all elements of a project are kept together. This includes everything from CDs to multi-tracks and documents, all of which are stored in the same area of the same shelf.

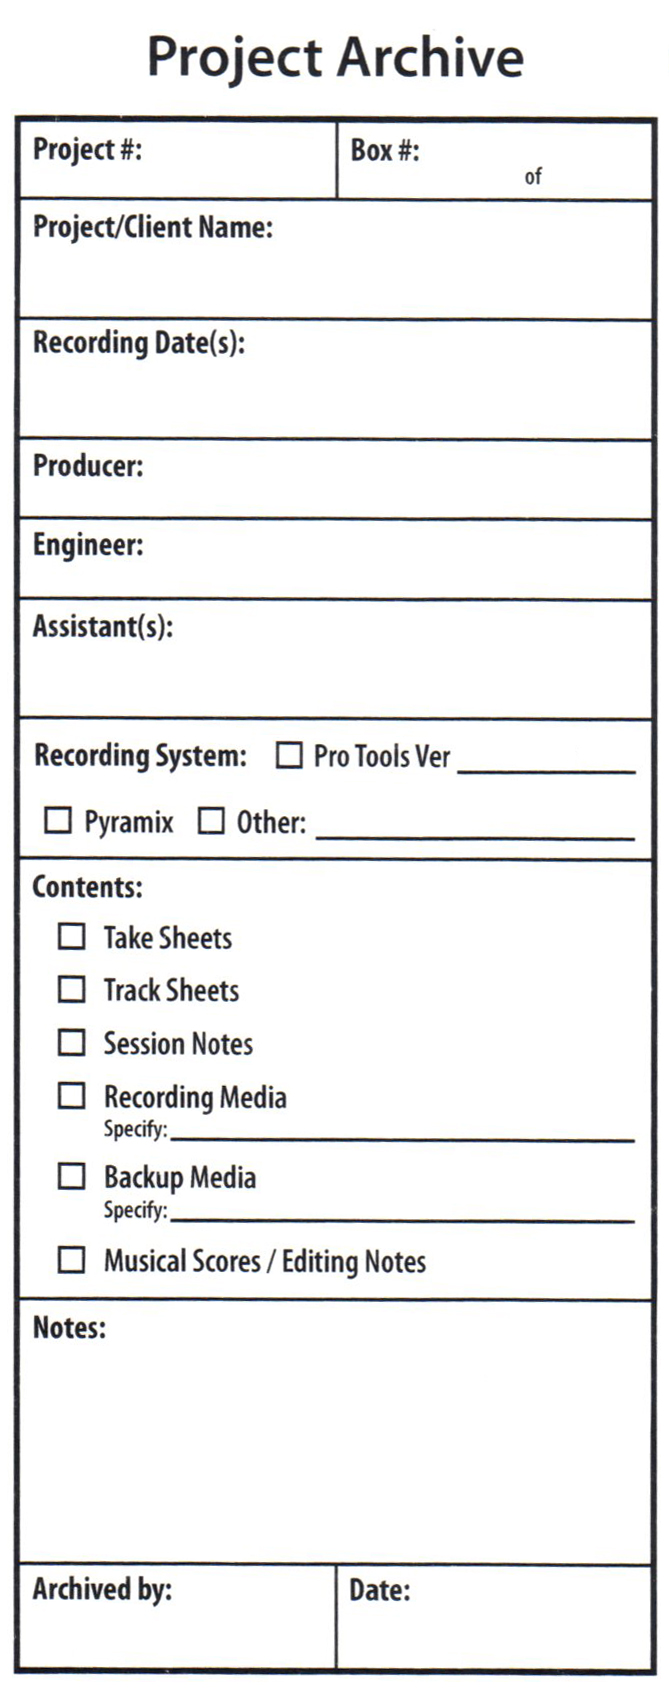
I keep all these elements organized thanks to a wonderful box label I first discovered at the Banff Centre for the Arts and which I have since adapted for my own use. As I’ve said, you have to discover what works best for you, and there’s nothing quite like finding a pre-made solution which works great. You’ll notice that this label differs from that recommended by the Producers and Engineers wing media label recommendations, which I do use, but only for media I’m shipping. I use my own label for internal archiving.

Asset Management
With both your physical and digital data wrangled, you might be inclined to just stop there. However, there are several things you could be doing to make keeping track of all your data a great deal easier. Asset management is one area where those who work in large production environments with clearly defined data management policies have it far easier. After all, most larger operations employ their database du jour (from the exceedingly complex to a simple spreadsheet) which track projects using project numbers and their related assets. If you don’t run a database (I don’t) consider creating a project number field in your financial management program. We’re all invoicing clients, right? By leading with a project number on all folder names you can be assured to find what you’re looking for down the road. Similarly, be certain to label every piece of physical data with the same project number, including its storage box. This is where my handy dandy label comes in.

Finally, when it comes to asset management, I like to make sure I know exactly where session files are stored. For instance, what if you are a small studio but still have 30 or 40 hard drive of data kicking around? Sure, there might be better ways to handle the archive which is a discussion best handled in a far different article. But how do you keep track of your data?

First, I like to name each hard drive logically and sequentially. I use HDAUDIO_01, HDAUDIO_02, and so forth. When I’m archiving data, the name of this drive is written on the box so I can’t possibly loose the files. Because I’m a small operation, I also track these critical details in my invoicing application. I also like to print a physical copy of the directory listing which lives in the archive box, so I know the exact state of a project at any given time. There are several shareware applications which can accomplish this task, but if I’m working on a PC I like to utilize Directory List & Print, and on the Mac my tool of choice is Print Window.

Full Circle
As I’ve said, it can be quite a task to properly manage your data not only during session but once they’re completed. Thankfully, there are several things you can do to make the tasks far more manageable. Now, is what I’ve laid out the be all-end all for managing your data? If it is, frankly, I’d be surprised. Though I’m awfully seasoned in this area, my recommendations are what work best for my clients and me – your mileage may vary drastically.  So, get out there and discover what works best for you. But most importantly, please make certain you implement a solid data organization for your studio, and let me know what works for you because I’m very much interested!

Take A Moment To Observe World Backup Day & Evaluate Your Storage Strategies

blog, pswblog, recording, system maintenance · 2011-03-31

As some of you may have noticed, I’m far more paranoid than most about the backing up of data. However, today as we take a moment to remember (or in some cases, mourn) the passing of World Backup Day, I’m left wondering why so few people take data backup seriously.

Let me share with you a recent story from my own experience. Just yesterday, I took delivery of a shiny new RAID after my own (albeit brief) data scare. My single remaining non-RAID online drive had hesitated to mount previously in the week due to a mismatched power supply.

Thankfully, using the correct power supply immediately solved the problem. However, it left me with a sinking feeling that illustrated the importance of proper backups. After all, even those of us who backup regularly are not without fault, and I hadn’t yet made a safety of this particular project.

Surely most of you recording professionals out there have a tried-and-true backup method in place. If not, I shared some thoughts on the subject last month in Backups: So Many Storage Options Yet Only One Chance.

For a far more in depth perspective, I would encourage you all to read the the various Technical Guidelines for Producers and Engineers set forth by The Recording Academy, which are free for members and non-members alike. Especially helpful in the archive process and the explanation of various long term storage media is the Digital Audio Workstation Guidelines for Music Production (pdf), of which there is an abbreviated Quick Reference Guide (pdf).

What I find most striking as I contemplate the concept of backing up is that some of the people I know who are the most judicious about recording data backups are rather haphazard in backing up their own personal systems, or even their most critical files.

Says Kevin Purdy of Lifehacker:

Why World Backup Day? Unfortunately, it’s necessary, as BackBlaze pointed out during Backup Awareness Month last year, with only 8 percent of those surveyed backing up their data daily. Hard drives and other storage, every single device, will fail at some point, and will never provide a fair warning about it. So find a way to put your data in two extra places: one convenient and nearby, another far away from your house or office.

Sage advice, really. I’ve said it before and I’ll say it again, there are two kinds of people – those who have experienced a hard drive failure and those who will. So on this remembrance of World Backup Day, be sure to take the opportunity and ensure that all your date is secure: both personal and professional.

Via Lifehacker.

backups: so many storage options yet only one chance

blog, pswfeature · 2011-02-10

It’s been said by IT professionals around the world that there are two kinds of people – those who have experienced a hard drive failure and those who will. Unfortunately, we surely all know at least one person who’s lost data in a catastrophic failure.

Personally, I’m a believer in the 3-2-1 backup strategy which has been expanded upon greatly by Richard Anderson in his article aimed at digital photographers.

Put simply, for every file you intend to preserve you must have three copies of that file, on two different forms of media, at least 1 of which is stored (securely) off-site. This protects the data (and your reputation) not just against hard drive crashes, but other disasters as well.

So, this begs the question, how are you backing up you data? If you’re reading this article, my guess is that you may already be wondering if you’re doing everything you can to protect your information. Don’t worry, I wont judge. If we’re going to be honest, I haven’t followed this backup strategy 100% until just recently. After all, it only takes just one near miss…

I received a rather frantic email recently from a client on this very subject. It was he who’d had this near miss when one of his hard drives failed; he nearly lost years of work. Unfortunately, a few files were corrupted on the drive and he wanted to know if I still had them.

Sure! Granted, the project was from 2004, but my data retention policies are such that I keep everything. More on that another time…

Anyways, I fired up one of my many offline storage drives, uploaded the files to FTP, and washed my hands of the task. However, days later, the age of my backup drives began to weigh on my conscience. After all, the data had been sitting there for quite some time, and what if the failure had occurred not to a client but to me? Then the data wouldn’t have been salvageable!

I decided to take a long, hard look at my data backup process. To clarify, this isn’t to be mistaken for how I backup my primary system drives, though I’m certain some of these changes will trickle down to that as well. Rather, this is strictly how I backup my non-system drives which contain all my online and offline sessions (You are recording to a non-system drive, right?). One of these days I’ll talk about system drive backups if anyone is really all that interested.

The Process
Essentially, I like to think through backups as a series of options. To achieve two local and one remote backup there are any number of solutions we can use. It’s all about weighing the pros and cons of each with regard to your individual needs. So, we’ll take a look at the various technologies available for backups. However, one thing to keep in mind when you’re actually shopping for drives, no matter the technology employed, is the platters employed within. The life expectancy of a drive is related to its MTBF or mean time before failure. However, the MTBF is just that – a mean – which represents the average failure rate for the entire population of drives tested.

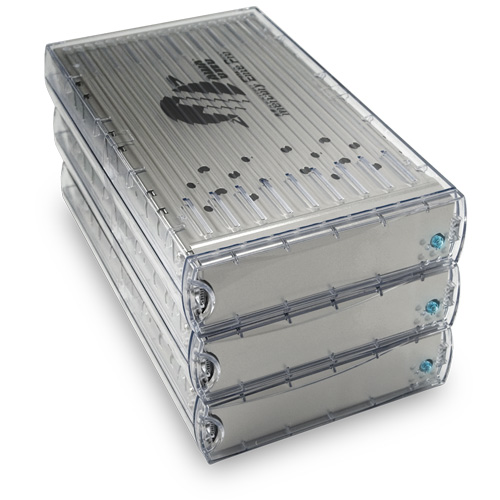
OWC Mercury Elite Classic

This value is generally high, but it does tell you something about the likelihood that your drive will fail. There is no way to tell exactly how long a drive will last but if you’re shopping for drives taking a look at the enclosed platters’ MTBF data is a great idea. Now, on to the options!

Single Drives
A single hard drive is a great storage solution for its capacity (which is constantly expanding by the day). That is of course until it fails which is why it’s important to have 2 copies of your data backed up. If you only have a small studio, two single drives are not a bad backup at all.

However, even if you use another backup method, singular hard drives make a wonderful working or “online” drive. If you’re the type to build your own drive, I can’t recommend highly enough the Hitachi Ultrastar series of discs, but any enterprise-class disc is a safe bet. My personal choices for pre-made enclosures are the Other World Computing Mercury and Mercury Elite’s.

Computer Attached Multi-Disc Enclosures
Once you’ve outgrown a single disc solution, you know you’ve accumulated a lot of data! You could seemingly add another single disc to your workflow which is what I’ve been doing up until now. My tipping point was 6 single drives which made finding files rather convoluted.

A much better alternative is stepping up to a multi-disc enclosure. These often have the added benefit of expandability along with the data hoarders best friend, RAID technology. An acronym for Redundant Array of Independent Disks, a RAID array is a serious step up from a single platter.

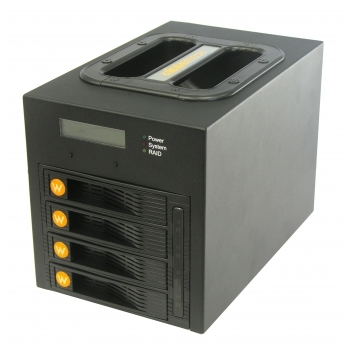
Wiebtech RTX400-QR

It’s a technology that provides increased storage functions and reliability through redundancy which is achieved by combining multiple disk components into a single cohesive unit, where data is distributed across the drives in one of several ways called “RAID levels”.

There are numerous great (albeit pricy) units on the market today, some of my favorites being the Wiebtech RTX400-QR (at right) and any of the numerous options from Other World Computing. Having a RAID array is a perfect way to achieve two local copies of data, especially due to RAID technology’s ability to rebuild the array after a failure. You’ll notice I called these devices “computer attached.” So, what if you wanted a massive RAID backup bout wanted to place it on your network? Enter the NAS!

Network Attached Storage
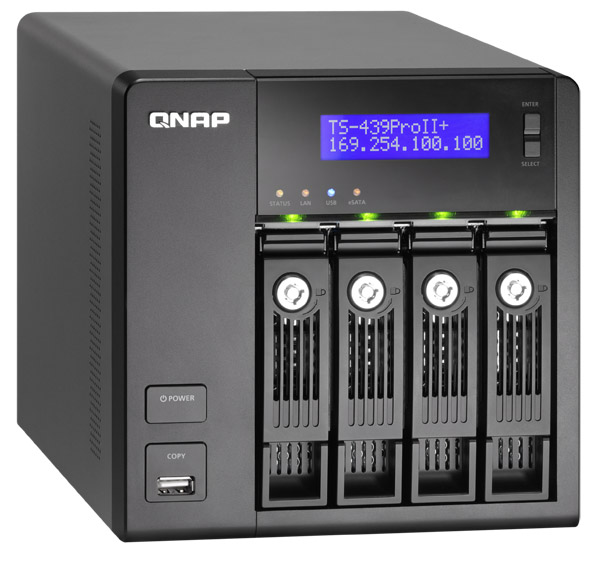
If your studio workflow contains a multitude of computers and you want to backup all your projects to a singular location, a NAS is quite a solution. Depending on its configuration, it can function as either a RAID or (sorry, it’s acronym time again) as a large singular drive which is called JBOD or “Just a Bunch of Drives.”

QNAP TS-439 Pro II+ Turbo NAS

Depending upon your needs and the configuration of the NAS, projects can potentially be retrieved remotely with the proper credentials. My favorite candidate in this category has recently become the line by Qnap, one which I’m slated to deploy for a client in the coming month.

Welcome To The Cloud
When it comes to off-site backups, that’s when many people begin to falter. After all, it’s one thing to purchase a whiz-bang RAID enclosure and back everything up, but when you start talking about finding another place for your data to live which isn’t in your studio, that’s when things get a bit tricky.

Unless you’re going to constantly image your backup and rotate it offsite (I’ve received this suggestion by corporate IT folk), it’s likely you’re going to be looking at some form of storage “in the cloud“. Cloud storage has become extremely popular in the pat year although many will tell you it comes with risks. They’re correct, although it’s worth remembering that “cloud storage” is just another way of saying your information is stored in a large data center, some of which have serious backup plans of their own. They’re worthy of consideration.

Iron Mountain Data Bunker

One of my favorite options for online storage is Dropbox, which offers a modest amount of free space and paid plan beyond that. Another great cloud storage option is Jungle Disk. While I’ve never tried it, the features are quite solid, especially given the price. If you’re looking for a secure cloud server but don’t need something quite within the range of military grade, it’s worth considering.

While Dropbox and Jungle Disk are worthy backup options, what about the truly paranoid among us (myself included) when it comes to remote storage? Thankfully, there’s always at least one option out there which goes the extra mile; for critical backups I’m excited about the availability of Iron Mountain’s subterranean data bunker.

While seemingly extreme, if your data is mission critical (and you know it is), there’s a great deal of comfort in knowing your backups are safe offsite in a highly secure underground facility, and mirrored to a second data center for full fail-over redundancy while your data remains encrypted in transport and storage.

The Verdict
You may be wondering, having heard these options, exact what solution I settled upon. It was quite a struggle, but I decided the best option for me was a computer attached RAID coupled with a single disc for online work, and a third copy of my data mirrored in Iron Mountain. Why, you might ask? I decided that having a physically attached RAID was the best option as i only mix on one or tow computers.

Also, I feel the singular drive is necessary as I don’t want to run the risk of corrupting my backup by working from it on a daily basis. I’ll admit that Iron Mountain is a bit of a splurge when it comes to data archival, however, I decided it’s hard to put a price on knowing that there’s always another copy of everything I need, fully RAID’ed and geographically separated, so I know it’s safe. Basically, if I lose something, it means there’s been a catastrophic event so terrible that the data has probably become irrelevant. And frankly, I’m ok with those odds.

I’m certain that someone out there has noticed I skipped over a few backup options. For instance, DVD backup. Personally, I don’t find it convenient to burn a backup of every session twice, and then make amendments to that backup if I work on it again. Plus, a suitable offsite storage location is still required. I know safety deposit boxes are popular, but while this backup methodology is perfectly valid and reliable for smaller quantities of data, I don’t feel it’s worthwhile to entertain when dealing in terabytes.

No matter the route, whether it’s a few single hard drives coupled with Dropbox or an in-studio server farm which makes my storage upgrade look minuscule at best, I hope you’ve found these options insightful. After all, few experiences are more painful than data loss, and I hope when you’re greeted with the heart-wrenching clicking of an armature that you know everything is safe and sound on another drive.

Happy archiving!

protools errors: the gifts that keep on giving

blog, pswblog · 2010-02-23

Sometimes, when you’re working in ProTools, it’d be nice to get past the errors and actually get to mixing. At least that’s how I felt Sunday. I’d received a last minute assignment late Saturday and set out to mixing on Sunday. Eager to get started I fired up ProTools after a quick reboot, built my session, and hit play to hear what I was dealing with when I was greeted with a rather unwelcome surprise.

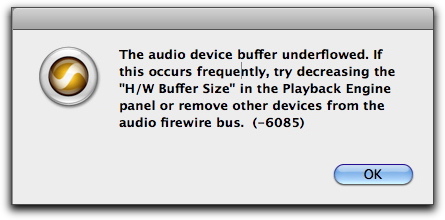
ProTools H/W Buffer Size Error 6085

Seriously? A hardware buffer size error? It’s always unpleasant to be greeted with an error, especially when not a single part of your system has changed since the last use. Apparently I wasn’t going to be mixing for a while, so I rolled up my sleeves and began troubleshooting. First I decreased the H/W Buffer size, which had no effect, and then I increased the H/W Buffer size since Digidesign’s engineer’s seem to have become confused about whether a smaller or larger buffer is useful. However, a larger buffer also did no help. Becoming slightly vexed, I ensured that there were no unnecessary devices on the FireWire chain; eventually only my MBox 2Pro and a hard drive were daisy chained together in a manner which has been previously described in an earlier post.

As I had yet to resolve the issue in a satisfactory amount of time, I once again headed to my favorite resources, the Digi User Conference (DUC) and the Digidesign Support Knowledge Base. This time around, the Digidesign gods were slightly more helpful, and yielded several articles about H/W Buffer Size Error 6085. However, no solution seemed to shake that pesky error screen.

Finally, after several reboots, swaps of hard drives, ProTools Preference and Digidesign Database trashings, permission repairs, PRAM and NVRAM resets, the solution came to me. Why not try what solved my DAE Error 700 issue?

Bingo . . .

All of a sudden, as happened before with my little DAE Error 700 adventure, suddenly everything cleared up immediately when I changed the MBox’s clock source away from from and back to Internal. It’s interesting that this trick fixes so many MBox 2 problems, as this was the same solution for the intermittent white noise issue before Digidesign issued a firmware update.

Is there a lesson to be learned here? For me, absolutely! If you have an MBox and you’re exhibiting an sort of errors, first try changing the clock source before you go the same lengths as I to solve the problem. You just may be surprised with the results, and with more hours left in the day as well.

Have a thought on ProTools or other DAW errors? Have a tried and true method of troubleshooting these masters of darkness other than your trusty Google ninja skills? Please let me know in the comments!

thumbnail via Wikimedia Commons

the value of ups protection in your studio

blog, pswblog · 2010-02-04

The other evening was a particularly harrowing time to use Pro Audio equipment in the Midwest. Why? Well, it was freezing rain, which had a fairly devastating effect on the local power grid. Power didn’t go out, rather it wavered intermittently for hours. Thankfully, when I setup my studio, I invested in several Uninterruptible Power Supplies (UPS) which have paid for themselves several times over. The evening in question, for instance, the UPS allowed me to finish my work and save my session without my computer powering down, losing connectivity with an audio interface, or my DAW crashing; all possibilities in intermittent power situations.

A UPS is a great investment if you live in an area plagued with power issues, but it’s a good idea no matter where you live because of the security it offers you in protecting not only your equipment but more importantly your data. This is because depending on the type of UPS you purchase, it can protect you from not only power failure, but surge, sag, spikes, noise, frequency instability, and harmonic distortion as well. There are several excellent manufacturers of UPS units, including APC, Tripp-Lite, Furman, and Middle Atlantic. It’s worth noting that no matter which manufacturer you choose, if you’re backing up audio equipment, it’s best to use an online unit that offers sine wave output.

When shopping for a UPS to backup your studio it’s important not to make the common mistake I seen seen time and time again; under powered UPS units. I once helped someone specify a new UPS several years after they had purchased their first. When I asked why wished to upgrade, they remarked that while the UPS kept their computer running long enough to save and shut down, it wasn’t enough to power the monitor. This left them having to save and shut down blind; effective yet extremely disconcerting to clients and engineers alike.

This is a very important lesson, and one often ignored until data has inadvertently been lost the first time. When specifying a UPS unit, you need to ensure that anything necessary to finish work, save, and shut down is powered by battery. Additionally, you need to leave sufficient capacity for expansion. Devices that commonly require power to allow you finish your work and safely save include the following.

  • Computers
  • Monitors
  • Audio Interfaces and Converters
  • MIDI Interfaces
  • Expansion Chassis
  • All external storage devices
    • Hard Drives
    • Digital Tape
    • Disc Burners (CD/DVD)
    • Anything on which you may need to save
  • Essential Connected Peripherals
    • Keyboard
    • Mouse
    • USB & FireWire hubs
  • Power Sequencers and/or Conditioner

It is extremely important that all equipment essential to finishing a mix before saving be protected by UPS, as a hard drive or audio interface going offline can easily lock up and crash your DAW, making saving your data all but impossible. You personally may prefer the ability to bounce down before saving, so your essential equipment could include a signature EQ and monitors, or it could be the bare essentials of just a computer, hard drive, and audio interface. When it comes down to it, the equipment you backup is a very personal choice, however it’s worth remembering that a few hundred dollars for UPS protection is rather inconsequential compared to the cost of thousands of dollars worth of equipment and truly priceless data.

Let’s suppose for a moment that you’re sold UPS on protection. It’s advisable to routinely test your UPS, ideally twice a year, but every 18 months at a minimum. While the unit may work great one day, a year down the road the road the battery might not hold a charge like it did when it was new. If the performance isn’t up to par, replace the battery as soon as possible because you don’t want to be caught off guard. Also, as a side note, it’s worth remembering that even if you’ve taken the steps to protect your studio equipment with a UPS, it is not a replacement for a power conditioner or sequencer. It’s easy to say you can never be too careful, but in this case it’s true.

So, is an Uninterruptible Power Supply worth the cost? Well, that’s something that has to weighed by each individual when making the consideration to purchase. For me, the savings is not only in protecting my equipment and data, but also in the brief ability to finish work when power fails. No matter your justification, if your considering power protection, a UPS is a tremendous asset.

Have an opinion on power protection? Found a favorite UPS and just want to share? Please let me know in the comments!

thumbnail by bulliver

walk down that lonesome road of dae errors

blog, pswblog · 2010-01-25

Sometimes, despite you’re best intentions, things just go wrong. I know, because that’s exactly what happened to me today. I sat down at a workstation that worked perfectly the day before (ok, not perfectly, but you get the point), opened up ProTools with my MBox 2 Pro attached, and that’s when the trouble began.

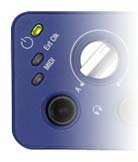
To rewind a bit, there’s a light on the front panel of the MB2Pro. Mine is green because I use the power supply, however it can also be amber if it’s drawing bus power.

image via Digidesign

Yep, that’s the pesky little power light, right above the External Clock and MIDI lights. However, for some reason, mine was blinking consistently on and off. I knew that if no lights were lighted then the firmware was compromised. However, I could find nothing that explained away a blinking power light. So, I decided to launch into ProTools and see if it would just go away.

Nope… I was greeted at the splash screen with an error. Not just any error, mind you, but one I had never before encountered; DAE Error 700. Being no stranger to DAE Errors, I figured my best bet (and yours, if you’re ever in a similar situation), was to first head to the Digi User Conference (DUC) and do a little searching. Unfortunately, a search yielded 2 pages of fairly useless and unrelated information. However, there was one helpful post that reminded me to delete all my preferences and reboot. Nothing I didn’t already know, but a welcome suggestion at this point. Moving on, a search on the Digidesign Support Knowledge Base yielded 55 pages of possibilities, none of which had anything remotely to do with DAE Error 700, so onward I marched.

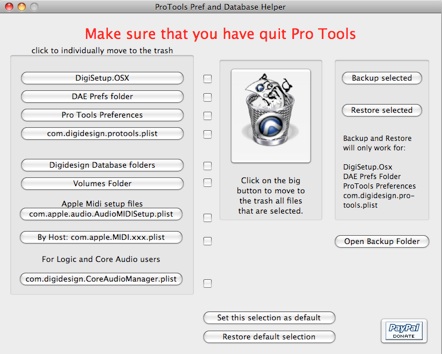
Deciding to use what advice I could from the DUC, I fired up the extremely helpful ProTools Prefs & Database Helper by Jean-Charles Deshaies which greatly expedites the process of deleting the multitude to ProTools and Digidesign databases across a system.

While using Mr. Deshaies’ excellent utility certainly saved me some time, I was still receiving DAE Error 700 even after running the utility, emptying the Trash, and rebooting ProTools. So, I was at an impasse. After some serious Google searching I had discovered only one post even slightly related other than what I’d found on the DUC, which pertained to the engineer receiving the same error immediately after experiencing a terrible feedback loop.

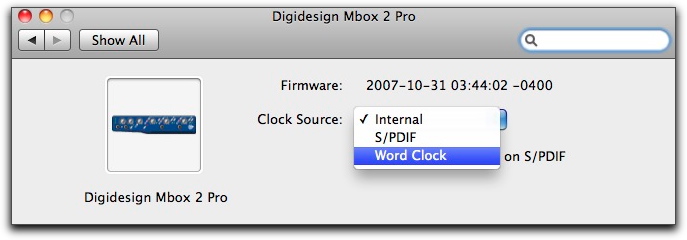
So, I got to thinking… and I remembered that my MBox 2 Pro also has a Preference Pane in System Preferences. I didn’t recall it controlling much, but as I couldn’t get ProTools to launch, what did I have to lose?

Yep, there it was, lurking under “Other.” Upon inspection, I found that I had only two, maybe three options. I could learn about my Firmware version, change my Clock Source, or I could Mirror Analog 1-2 or S/PDIF.

Assuming that my DAE Error didn’t have anything to do with a long standing feud between Analog 1-2 and S/PDIF, I decided no worse a fate would befall me if I changed my clock source from Internal to Word Clock. It’s worth noting at this point, that the only connections between my MB2Pro and my mixer are 2 TRS cables.

Lo and behold, suddenly my power light locked solid and the External Clock light began to blink, as it couldn’t find an external sync. Hoping for a second stroke of luck, I changed the Clock Source back to internal and the power light remained solid. Emboldened, I launched into ProTools without incident and continued along my day without incident. What was the real cause of the problem. I may never know…

Is there a lesson in all this? Absolutely! Knowing where to go when any program, especially ProTools, gives you errors is crucial. My first stop is always the DUC because it provides real world solutions and advice from Digidesign users, followed by the Digidesign Support page which allows you to search by error number and error phraseology. If I still haven’t found an answer, that’s when I hit Google. Hopefully, if your issue isn’t documented in the DUC or the Digidesign KB, then someone has documented their experience in a blog post. Who knows, maybe that’s the precise reason you’re here? Either way, I hope you’ve found this information useful, and happy error quashing!

Have a thought on DAE or other errors? Have a tried and true method of troubleshooting these masters of darkness other than Knowledge Base spelunking? Please let me know in the comments!

thumbnail via Wikimedia Commons

firewire device hierarchy: does it really matter?

blog, pswblog · 2010-01-20

FireWire; it just sounds fast, doesn’t it? At the very least, it certainly sounds faster than USB. Perhaps that was Apple’s intention when they sat down with Sony, Texas Instruments, and many others to create an amazingly accessible data transfer specification that conjured up the image of reliability ease of use within the minds of users. However, if FireWire has one flaw, it’s that it’s too easy to use. What do I mean? Let’s compare the connectors for USB and FireWire. While USB has an A and a B side, FireWire simply has a side. Sure, FireWire has 2 different specifications with 2 distinctly different connectors, however, each has only one connector style.

Back to the point…
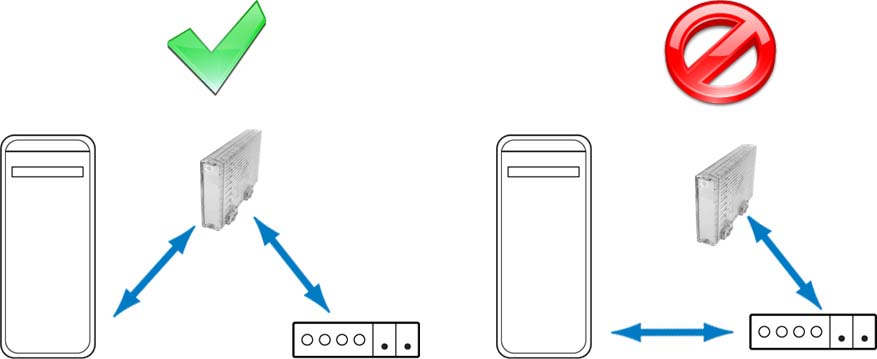
If FireWire has one flaw, it’s that it’s too easy to use, because there’s often a great deal of confusion as to in what hierarchical order devices get connected, as any device can seemingly be plugged into another. In reading audio forums and message boards over the past 2 weeks, I have found nearly two-dozen post asking which comes first, the audio interface or the drive. Why? More often than not, engineers are concerned about possible audio drop outs and decreased drive performance, which aren’t completely unreasonable concerns.

Why is this an issue?
Can’t devices be plugged in however I want? Well, that depends, really. Some device manufacturers like MOTU and Apogee make no mention of a device hierarchy preference. Others, such as RME, have seen notes in their forum that when using on Mac’s containing the LSI/Agere FireWire chip-set their audio devices only work when a FireWire drive is placed between the audio interface and the computer. Others still, such as industry leader Digidesign, note the following. Personally, the fact that this is spelled out so plainly just makes me feel it’s a necessity.

From the 003 Getting Started Manual
Connect FireWire hard drives directly to a FireWire port on your computer.

The FireWire ports on 003 and 003 Rack do not pass audio data when they are powered off. If you daisy-chain FireWire devices from your computer, it is best to connect FireWire hard drives directly to your computer and not to 003 or 003 Rack. This will prevent hard drive errors and data loss in case 003 or 003 Rack is powered off.

If your computer has only one FireWire port, connect the FireWire hard drive directly to your computer and then connect 003 or 003 Rack to an available FireWire port on the drive.

via Digidesign (pdf)


via Apple, Wikimedia Commons, and OWC


Ok, so this is just for ProTools users and the paranoid?
No, not really… Personally, I think it’s good to adopt a set methodology of doing something even as mundane as hooking up a hard drive and stick to it, which is why I practice this habit. Also, for the other end of paranoid who are worried about audio drop outs, sticking to a stable setup will allow you to trouble shoot the root cause of those issue as it’s probably not FireWire bandwidth.

Why?
Well, a number of reasons. If you read the basics of the IEEE 1394 spec (it’s a dry read) or consult the 1394 Trade Association you’ll find that FireWire can connect up to 62 peripherals. Now, obviously you’re not going to do something foolish like that in a recording session. In fact, if you read the Digidesign ProTools 8.0 LE System Requirements, you’ll see that Digidesign recommends no more than 4 daisy chained FireWire drives, which are not to be mixed of FireWire 400 and 800. However, even at 4 drives, that gives you quite a bit of leeway before you should start to have any problems.

So, I should just trust you?
Well, ultimately that’s you’re decision, isn’t it? Personally I think this is sound policy and given what I’ve found I’m not the only one. However, if you’re a Mac or PC user with multiple free FireWire ports or a DAW user that uses a USB Hard Drive (shame on you!), then this really is of little concern to you. Either way, if you’re ever in a situation where the hierarchy of FireWire devices is at issue, I’d recommend placing hard drives in line before audio interfaces.

What’s your take on FireWire connectivity? Do you have a set device hookup methodology? Try it a different way each time? Whatever your thoughts or experiences, let us know in the comments below!

thumbnail via Apple


cable wrapping and technique

blog, pswblog · 2010-01-07

An audio systems last feet of interconnect; arguably one of the most crucial pieces of the system yet it’s often one of the areas most vulnerable to accidental damage. Concerned? You should be! It’s not that the damaged cable can’t be replaced, as that’s a fairly easy task. However, while this damaged equipment can be replaced or conceivably repaired, the question still remains why was it damaged in the first place? Well, my educated guess is poor cable wrapping technique, not by you but by uninformed assistants or volunteers, which over time has played a significant role.

In speaking with a colleague, I was prompted to peruse a few audio message boards and forums to look at “tutorials” about cable wrapping, which provided a great deal of insight into the problem. Thankfully, there are several very helpful and well produced instructional videos on the subject which are available online, many even on YouTube. At least one of them was created by a cable manufacturer. Unfortunately, while good and correct information is available, it does take initial knowledge on the part of the viewer to know which tutorials are useful and which ones will do more harm than good; a rather unfortunate situation for young or beginning engineers searching for information.

One of many correct tutorials on cable wrapping (aka: the over-under technique):

video by PlanetWaves

While many videos are well intentioned, only some demonstrate the correct over-under cable wrapping technique.  What’s my point in all this? Well, personally, I know I’m likely to spend extra time at a gig coiling all my cables by myself properly if i can avoid having to uncoil, unkink, and recoil them again later due to well intentioned yet ill trained assistants or volunteers who were wrapping my cables around their elbows. My guess is that you’re of a similar mind.

So? Please, encourage and train proper over-under cable wrapping technique. Whether it’s mentoring younger engineers not yet in the know, showing a struggling volunteer you happen upon a better way, or pointing out the proper online resources to those just wanting to learn, you’ll be saving all engineers a major headache down the road.

Have an opinion on cable coiling? Found a tremendously terrible or simply amazing tutorial about this or another notable topic and just want to share? Please let me know in the comments!

thumbnail by mahalie

  • Go to page 1
  • Go to page 2
  • Go to Next Page »

Primary Sidebar

Connect

  • Instagram
  • LinkedIn
  • YouTube

© 2003–2023 · Log in