• Skip to primary navigation
  • Skip to main content
  • Skip to primary sidebar

kylie grace snyder

audio engineering, technology, and miscellany . . .

  • blog & news
  • teaching & research
  • CV
  • U-M Wiki
  • contact

blog

session interchange options in a pinch

blog, pswblog · 2010-03-24

I know you’re going to be shocked to learn this, but there actually are DAW’s other than ProTools. You’re stunned, right? I just knew you would be. All kidding aside, I tend to do most of my work in ProTools. However, I do have occasion to mix in other DAW’s from time to time depending on the needs of clients. For instance, the other day I was mixing across town for a client and the session had been tracked in Logic. However, a separate session existed in ProTools in which some effects had already been edited.

So, what could I do to get everything working together in one session? Well, I had a few options…

  • Export the Logic session as an OMF
  • Export individual files from Logic
  • Export the ProTools session as an OMF
  • Export individual files from ProTools

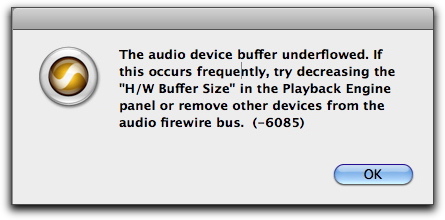
Unfortunately, I didn’t have my iLok with me which contains my DigiTranslator license, so that scrapped any chance of using OMF. The Logic session contained several times more tracks than the ProTools session, so apparently I was going to export all my files individually from ProTools an reassemble them within Logic. However, they were already edited with fades applied and had been laid out properly within the timeline. How can you migrate all that data without losing something?

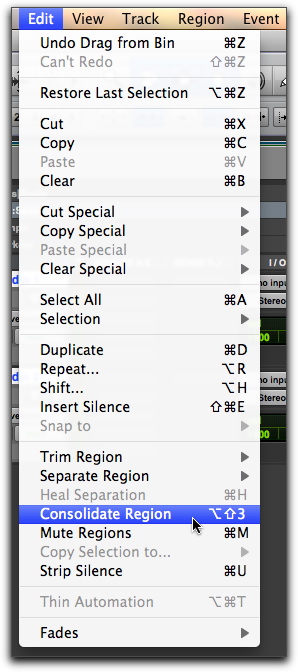
Very simple. Region Consolidation!

That’s right, the answer really is that simple!

  • Highlight all the tracks from Bar 1 to the end of the song.
  • Select Consolidate in the Edit menu which will cause new, individual, continuous files to be created.
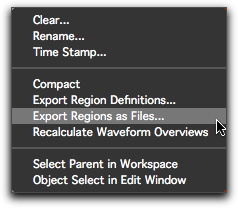
  • Upon consolidation, your new continuous files will be highlighted in the Region List. Right Click on those highlighted files and select Export Regions as Files.

  • All that’s left is to save. I prefer to use the WAV format for interchange, but that’s a personal choice.

Who would have though it could be so easy to not purchase DigiTranslator? I kid, I kid… Of course, you do have to import your files into your other DAW of choice and drag them to Bar 1, but that’s fairly quick work. For those looking for a more streamlined alternative to the above described solution but still wishing to be thrifty, there’s also the very intriguing SSL Pro Convert. While I haven’t tried this offering from SSL, it certainly appears to be a cost effective alternative. Of course, the next time I forget my iLok, I’ll stick with the frugal choice; region consolidation.

Have an opinion on session interchange options? Please let me know in the comments!

thumbnail via Wikimedia Commons and EDL

protools errors: the gifts that keep on giving

blog, pswblog · 2010-02-23

Sometimes, when you’re working in ProTools, it’d be nice to get past the errors and actually get to mixing. At least that’s how I felt Sunday. I’d received a last minute assignment late Saturday and set out to mixing on Sunday. Eager to get started I fired up ProTools after a quick reboot, built my session, and hit play to hear what I was dealing with when I was greeted with a rather unwelcome surprise.

ProTools H/W Buffer Size Error 6085

Seriously? A hardware buffer size error? It’s always unpleasant to be greeted with an error, especially when not a single part of your system has changed since the last use. Apparently I wasn’t going to be mixing for a while, so I rolled up my sleeves and began troubleshooting. First I decreased the H/W Buffer size, which had no effect, and then I increased the H/W Buffer size since Digidesign’s engineer’s seem to have become confused about whether a smaller or larger buffer is useful. However, a larger buffer also did no help. Becoming slightly vexed, I ensured that there were no unnecessary devices on the FireWire chain; eventually only my MBox 2Pro and a hard drive were daisy chained together in a manner which has been previously described in an earlier post.

As I had yet to resolve the issue in a satisfactory amount of time, I once again headed to my favorite resources, the Digi User Conference (DUC) and the Digidesign Support Knowledge Base. This time around, the Digidesign gods were slightly more helpful, and yielded several articles about H/W Buffer Size Error 6085. However, no solution seemed to shake that pesky error screen.

Finally, after several reboots, swaps of hard drives, ProTools Preference and Digidesign Database trashings, permission repairs, PRAM and NVRAM resets, the solution came to me. Why not try what solved my DAE Error 700 issue?

Bingo . . .

All of a sudden, as happened before with my little DAE Error 700 adventure, suddenly everything cleared up immediately when I changed the MBox’s clock source away from from and back to Internal. It’s interesting that this trick fixes so many MBox 2 problems, as this was the same solution for the intermittent white noise issue before Digidesign issued a firmware update.

Is there a lesson to be learned here? For me, absolutely! If you have an MBox and you’re exhibiting an sort of errors, first try changing the clock source before you go the same lengths as I to solve the problem. You just may be surprised with the results, and with more hours left in the day as well.

Have a thought on ProTools or other DAW errors? Have a tried and true method of troubleshooting these masters of darkness other than your trusty Google ninja skills? Please let me know in the comments!

thumbnail via Wikimedia Commons

the value of ups protection in your studio

blog, pswblog · 2010-02-04

The other evening was a particularly harrowing time to use Pro Audio equipment in the Midwest. Why? Well, it was freezing rain, which had a fairly devastating effect on the local power grid. Power didn’t go out, rather it wavered intermittently for hours. Thankfully, when I setup my studio, I invested in several Uninterruptible Power Supplies (UPS) which have paid for themselves several times over. The evening in question, for instance, the UPS allowed me to finish my work and save my session without my computer powering down, losing connectivity with an audio interface, or my DAW crashing; all possibilities in intermittent power situations.

A UPS is a great investment if you live in an area plagued with power issues, but it’s a good idea no matter where you live because of the security it offers you in protecting not only your equipment but more importantly your data. This is because depending on the type of UPS you purchase, it can protect you from not only power failure, but surge, sag, spikes, noise, frequency instability, and harmonic distortion as well. There are several excellent manufacturers of UPS units, including APC, Tripp-Lite, Furman, and Middle Atlantic. It’s worth noting that no matter which manufacturer you choose, if you’re backing up audio equipment, it’s best to use an online unit that offers sine wave output.

When shopping for a UPS to backup your studio it’s important not to make the common mistake I seen seen time and time again; under powered UPS units. I once helped someone specify a new UPS several years after they had purchased their first. When I asked why wished to upgrade, they remarked that while the UPS kept their computer running long enough to save and shut down, it wasn’t enough to power the monitor. This left them having to save and shut down blind; effective yet extremely disconcerting to clients and engineers alike.

This is a very important lesson, and one often ignored until data has inadvertently been lost the first time. When specifying a UPS unit, you need to ensure that anything necessary to finish work, save, and shut down is powered by battery. Additionally, you need to leave sufficient capacity for expansion. Devices that commonly require power to allow you finish your work and safely save include the following.

  • Computers
  • Monitors
  • Audio Interfaces and Converters
  • MIDI Interfaces
  • Expansion Chassis
  • All external storage devices
    • Hard Drives
    • Digital Tape
    • Disc Burners (CD/DVD)
    • Anything on which you may need to save
  • Essential Connected Peripherals
    • Keyboard
    • Mouse
    • USB & FireWire hubs
  • Power Sequencers and/or Conditioner

It is extremely important that all equipment essential to finishing a mix before saving be protected by UPS, as a hard drive or audio interface going offline can easily lock up and crash your DAW, making saving your data all but impossible. You personally may prefer the ability to bounce down before saving, so your essential equipment could include a signature EQ and monitors, or it could be the bare essentials of just a computer, hard drive, and audio interface. When it comes down to it, the equipment you backup is a very personal choice, however it’s worth remembering that a few hundred dollars for UPS protection is rather inconsequential compared to the cost of thousands of dollars worth of equipment and truly priceless data.

Let’s suppose for a moment that you’re sold UPS on protection. It’s advisable to routinely test your UPS, ideally twice a year, but every 18 months at a minimum. While the unit may work great one day, a year down the road the road the battery might not hold a charge like it did when it was new. If the performance isn’t up to par, replace the battery as soon as possible because you don’t want to be caught off guard. Also, as a side note, it’s worth remembering that even if you’ve taken the steps to protect your studio equipment with a UPS, it is not a replacement for a power conditioner or sequencer. It’s easy to say you can never be too careful, but in this case it’s true.

So, is an Uninterruptible Power Supply worth the cost? Well, that’s something that has to weighed by each individual when making the consideration to purchase. For me, the savings is not only in protecting my equipment and data, but also in the brief ability to finish work when power fails. No matter your justification, if your considering power protection, a UPS is a tremendous asset.

Have an opinion on power protection? Found a favorite UPS and just want to share? Please let me know in the comments!

thumbnail by bulliver

walk down that lonesome road of dae errors

blog, pswblog · 2010-01-25

Sometimes, despite you’re best intentions, things just go wrong. I know, because that’s exactly what happened to me today. I sat down at a workstation that worked perfectly the day before (ok, not perfectly, but you get the point), opened up ProTools with my MBox 2 Pro attached, and that’s when the trouble began.

To rewind a bit, there’s a light on the front panel of the MB2Pro. Mine is green because I use the power supply, however it can also be amber if it’s drawing bus power.

image via Digidesign

Yep, that’s the pesky little power light, right above the External Clock and MIDI lights. However, for some reason, mine was blinking consistently on and off. I knew that if no lights were lighted then the firmware was compromised. However, I could find nothing that explained away a blinking power light. So, I decided to launch into ProTools and see if it would just go away.

Nope… I was greeted at the splash screen with an error. Not just any error, mind you, but one I had never before encountered; DAE Error 700. Being no stranger to DAE Errors, I figured my best bet (and yours, if you’re ever in a similar situation), was to first head to the Digi User Conference (DUC) and do a little searching. Unfortunately, a search yielded 2 pages of fairly useless and unrelated information. However, there was one helpful post that reminded me to delete all my preferences and reboot. Nothing I didn’t already know, but a welcome suggestion at this point. Moving on, a search on the Digidesign Support Knowledge Base yielded 55 pages of possibilities, none of which had anything remotely to do with DAE Error 700, so onward I marched.

Deciding to use what advice I could from the DUC, I fired up the extremely helpful ProTools Prefs & Database Helper by Jean-Charles Deshaies which greatly expedites the process of deleting the multitude to ProTools and Digidesign databases across a system.

While using Mr. Deshaies’ excellent utility certainly saved me some time, I was still receiving DAE Error 700 even after running the utility, emptying the Trash, and rebooting ProTools. So, I was at an impasse. After some serious Google searching I had discovered only one post even slightly related other than what I’d found on the DUC, which pertained to the engineer receiving the same error immediately after experiencing a terrible feedback loop.

So, I got to thinking… and I remembered that my MBox 2 Pro also has a Preference Pane in System Preferences. I didn’t recall it controlling much, but as I couldn’t get ProTools to launch, what did I have to lose?

Yep, there it was, lurking under “Other.” Upon inspection, I found that I had only two, maybe three options. I could learn about my Firmware version, change my Clock Source, or I could Mirror Analog 1-2 or S/PDIF.

Assuming that my DAE Error didn’t have anything to do with a long standing feud between Analog 1-2 and S/PDIF, I decided no worse a fate would befall me if I changed my clock source from Internal to Word Clock. It’s worth noting at this point, that the only connections between my MB2Pro and my mixer are 2 TRS cables.

Lo and behold, suddenly my power light locked solid and the External Clock light began to blink, as it couldn’t find an external sync. Hoping for a second stroke of luck, I changed the Clock Source back to internal and the power light remained solid. Emboldened, I launched into ProTools without incident and continued along my day without incident. What was the real cause of the problem. I may never know…

Is there a lesson in all this? Absolutely! Knowing where to go when any program, especially ProTools, gives you errors is crucial. My first stop is always the DUC because it provides real world solutions and advice from Digidesign users, followed by the Digidesign Support page which allows you to search by error number and error phraseology. If I still haven’t found an answer, that’s when I hit Google. Hopefully, if your issue isn’t documented in the DUC or the Digidesign KB, then someone has documented their experience in a blog post. Who knows, maybe that’s the precise reason you’re here? Either way, I hope you’ve found this information useful, and happy error quashing!

Have a thought on DAE or other errors? Have a tried and true method of troubleshooting these masters of darkness other than Knowledge Base spelunking? Please let me know in the comments!

thumbnail via Wikimedia Commons

firewire device hierarchy: does it really matter?

blog, pswblog · 2010-01-20

FireWire; it just sounds fast, doesn’t it? At the very least, it certainly sounds faster than USB. Perhaps that was Apple’s intention when they sat down with Sony, Texas Instruments, and many others to create an amazingly accessible data transfer specification that conjured up the image of reliability ease of use within the minds of users. However, if FireWire has one flaw, it’s that it’s too easy to use. What do I mean? Let’s compare the connectors for USB and FireWire. While USB has an A and a B side, FireWire simply has a side. Sure, FireWire has 2 different specifications with 2 distinctly different connectors, however, each has only one connector style.

Back to the point…
If FireWire has one flaw, it’s that it’s too easy to use, because there’s often a great deal of confusion as to in what hierarchical order devices get connected, as any device can seemingly be plugged into another. In reading audio forums and message boards over the past 2 weeks, I have found nearly two-dozen post asking which comes first, the audio interface or the drive. Why? More often than not, engineers are concerned about possible audio drop outs and decreased drive performance, which aren’t completely unreasonable concerns.

Why is this an issue?
Can’t devices be plugged in however I want? Well, that depends, really. Some device manufacturers like MOTU and Apogee make no mention of a device hierarchy preference. Others, such as RME, have seen notes in their forum that when using on Mac’s containing the LSI/Agere FireWire chip-set their audio devices only work when a FireWire drive is placed between the audio interface and the computer. Others still, such as industry leader Digidesign, note the following. Personally, the fact that this is spelled out so plainly just makes me feel it’s a necessity.

From the 003 Getting Started Manual
Connect FireWire hard drives directly to a FireWire port on your computer.

The FireWire ports on 003 and 003 Rack do not pass audio data when they are powered off. If you daisy-chain FireWire devices from your computer, it is best to connect FireWire hard drives directly to your computer and not to 003 or 003 Rack. This will prevent hard drive errors and data loss in case 003 or 003 Rack is powered off.

If your computer has only one FireWire port, connect the FireWire hard drive directly to your computer and then connect 003 or 003 Rack to an available FireWire port on the drive.

via Digidesign (pdf)


via Apple, Wikimedia Commons, and OWC


Ok, so this is just for ProTools users and the paranoid?
No, not really… Personally, I think it’s good to adopt a set methodology of doing something even as mundane as hooking up a hard drive and stick to it, which is why I practice this habit. Also, for the other end of paranoid who are worried about audio drop outs, sticking to a stable setup will allow you to trouble shoot the root cause of those issue as it’s probably not FireWire bandwidth.

Why?
Well, a number of reasons. If you read the basics of the IEEE 1394 spec (it’s a dry read) or consult the 1394 Trade Association you’ll find that FireWire can connect up to 62 peripherals. Now, obviously you’re not going to do something foolish like that in a recording session. In fact, if you read the Digidesign ProTools 8.0 LE System Requirements, you’ll see that Digidesign recommends no more than 4 daisy chained FireWire drives, which are not to be mixed of FireWire 400 and 800. However, even at 4 drives, that gives you quite a bit of leeway before you should start to have any problems.

So, I should just trust you?
Well, ultimately that’s you’re decision, isn’t it? Personally I think this is sound policy and given what I’ve found I’m not the only one. However, if you’re a Mac or PC user with multiple free FireWire ports or a DAW user that uses a USB Hard Drive (shame on you!), then this really is of little concern to you. Either way, if you’re ever in a situation where the hierarchy of FireWire devices is at issue, I’d recommend placing hard drives in line before audio interfaces.

What’s your take on FireWire connectivity? Do you have a set device hookup methodology? Try it a different way each time? Whatever your thoughts or experiences, let us know in the comments below!

thumbnail via Apple


cable wrapping and technique

blog, pswblog · 2010-01-07

An audio systems last feet of interconnect; arguably one of the most crucial pieces of the system yet it’s often one of the areas most vulnerable to accidental damage. Concerned? You should be! It’s not that the damaged cable can’t be replaced, as that’s a fairly easy task. However, while this damaged equipment can be replaced or conceivably repaired, the question still remains why was it damaged in the first place? Well, my educated guess is poor cable wrapping technique, not by you but by uninformed assistants or volunteers, which over time has played a significant role.

In speaking with a colleague, I was prompted to peruse a few audio message boards and forums to look at “tutorials” about cable wrapping, which provided a great deal of insight into the problem. Thankfully, there are several very helpful and well produced instructional videos on the subject which are available online, many even on YouTube. At least one of them was created by a cable manufacturer. Unfortunately, while good and correct information is available, it does take initial knowledge on the part of the viewer to know which tutorials are useful and which ones will do more harm than good; a rather unfortunate situation for young or beginning engineers searching for information.

One of many correct tutorials on cable wrapping (aka: the over-under technique):

video by PlanetWaves

While many videos are well intentioned, only some demonstrate the correct over-under cable wrapping technique.  What’s my point in all this? Well, personally, I know I’m likely to spend extra time at a gig coiling all my cables by myself properly if i can avoid having to uncoil, unkink, and recoil them again later due to well intentioned yet ill trained assistants or volunteers who were wrapping my cables around their elbows. My guess is that you’re of a similar mind.

So? Please, encourage and train proper over-under cable wrapping technique. Whether it’s mentoring younger engineers not yet in the know, showing a struggling volunteer you happen upon a better way, or pointing out the proper online resources to those just wanting to learn, you’ll be saving all engineers a major headache down the road.

Have an opinion on cable coiling? Found a tremendously terrible or simply amazing tutorial about this or another notable topic and just want to share? Please let me know in the comments!

thumbnail by mahalie

microphone data resources

blog, pswblog · 2009-12-11

It’s no secret an engineer’s knowledge of his tools is a source of great power. Anytime I’m preparing for a recording session or live sound gig, the first thing I set upon once I determine the makeup of the ensemble and the equipment at my disposal is to determine how best to utilize the available microphones. One of the best tools any engineer has in this task are manufacturer specifications. However, almost all microphone manufacturer websites are laden with Flash applets that are difficult to navigate and which can make it impossible to find the correct information. Thankfully, websites exist that provide an interface far more convenient than most manufacturer websites, and provide data for almost every modern microphone in and out of production.

Microphone Data

Microphone Data – microphone-data.com

From Rycote, the makers of wonderful windshields, comes Microphone Data (free login required). They’ve compiled an extremely comprehensive database of microphone data which can be easily compared across manufactures and microphone styles. When it comes to planning for a gig, this is always my first stop.

“The Microphone Data website is the successor to the original Microphone Data Book – the truly comprehensive free online database & guide to microphones in professional use today. The Microphone Data site deals in facts, not opinions, with pictures, response curves and technical data from the manufacturers themselves for every currently listed microphone (and even a few that aren’t)”

from microphone-data.com

Recording Hacks

Recording Hacks – http://recordinghacks.com/microphones

Recording Hacks, the online magazine about recording gear and techniques, also maintains a wonderful database of current and out of production microphones. As well, they also maintain the official TapeOp Microphone Review Archive which is a fantastic source of microphone information.

Personally, I tend to “re-discover” these microphone data resources about once every six months, typically after becoming horribly frustrated that I can’t find the specifications I’m looking for, or after a futile attempt to compare specifications from different manufacturers. Whether you share my frustrations or you have reasons of your own, I hope that you’ll find value in these resources.

What’s your take on the currently available microphone resources? Do you swear by the Rycote database? Would never dream of using data that didn’t come right off the manufacturer’s server? Whatever your thoughts of experiences, let us know in the comments below!

don’t come unglued, bake a tape!

blog, pswblog · 2009-12-02

In late 2008 I was called out by a friend to repair a Studer tape deck; an A827, which I had never used before. While I was very fortunate that the studio owned both the original alignment tape and tentelometer, the original (rather aged and unused) tape shed like crazy because of its storage conditions, and our inability to bake the tape before use.

Baking has gotten myself and many a colleague out of a sticky (ha ha) situation. However, I’ve run across my fair share of engineers who either don’t know what baking is, or who don’t have a tried and true method. So, I thought I’d pass along this great article by Eddie Ciletti, If I Knew You Were Coming I’d Have Baked A Tape! It’s a remarkably thorough read, and full of information about tape baking for both novices and pro’s. It has been cited as the definitive source of information in all manner of post across the TapeOp Message Board (TOMB), GearSlutz, and even an Electronic Musician feature. While you’re there, check out some of his other articles on tape machine maintenance, which have all appeared in print, and include some great advice. All in all, what a great resource!

What do you think about tape baking? Whether you’re a novice or a seasoned pro, share you thoughts or experiences in the comments below!

help for remote computer support

blog · 2009-07-03

Anyone who’s worked remotely in supporting computer systems knows the frustration of being on the same page as the client. However, from Lifehacker comes a quick tip that can easily save hours of fumbling over the phone. Enter Support Details, “a site that makes life simpler when you ask the client what browser they’re using and they say ‘Vista.’”

Support Details

via Lifehacker / photo via Support Details

photo by thedak

  • « Go to Previous Page
  • Go to page 1
  • Interim pages omitted …
  • Go to page 4
  • Go to page 5
  • Go to page 6
  • Go to page 7
  • Go to Next Page »

Primary Sidebar

Connect

  • Instagram
  • LinkedIn
  • YouTube

© 2003–2025 · Log in